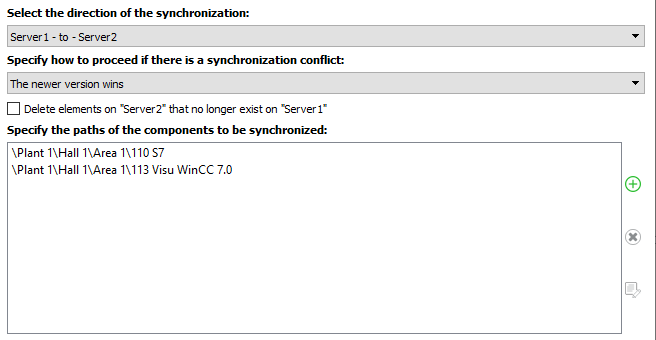
Synchronisation settings
If you have selected the option User-defined, after selecting each item you can directly set the synchronization settings for that item. In the Express configuration, you make the synchronization settings for all elements.

Direction of the synchronisation
In the upper dropdown menu, you can select the source server and the destination server and thus set the synchronization direction.
Dealing with synchronization conflicts
In the second dropdown menu, you can select which of the two servers involved in the synchronization is the dominant one. If a certain element already exists on both synchronization partners, the following applies:
-
If the source server is the dominant one, the state of the element is transferred from the source server to the destination server.
-
If the target server is the dominant one, the state of the element on the target server will be kept.
 Main rule when dealing with conflict: Changes are always made on the target server.
Here you have the following entries to choose from:
-
Server 1 wins: If the Server1 - to - Server2 synchronization direction has been selected, items already present on Server2 will be overwritten with those from Server1. If the synchronization direction is reversed, the state of the elements on Server1 will be kept.
-
Server 2 wins: If the Server2 - to - Server1 synchronization direction has been selected, items already present on Server1 will be overwritten with those from Server2. If the synchronization direction is reversed, the state of the elements on Server2 will be kept.
-
The newer version wins: If conflicts occur, the timestamp of the element is queried on the two servers. If the element on the target server is the older one, it will be overwritten by the newer one. Otherwise, the state of the item on the destination server is preserved.
-
No winner: The conflict remains unsettled. Items on Server1 stay on Server1, items on Server2 stay on Server2. If items were deleted on one server and are still present on the other server, this state is also preserved.
 This option is not available for the internal event log. Here, only destination server wins is possible.
Delete elements on "Server2" that no longer exist on "Server1"
If you have checked this checkbox, elements, that were present on both servers, will be dealt with as follows:
-
An element, that was deleted on the source server, will be deleted during synchronization on the target server.
-
An element, that was deleted on the target server, but is however still present, will be played again onto the target server during synchronization.
 This option is not available for the internal event log. The source server’s internal event log is included on the target server. Entries in the event log of the target server remain present on the target server. Entries from the source server’s event log are copied onto the target server as well.
Specify the paths of the components to be synchronised
If you have selected components when selecting elements, you can specify here which components are to be synchronized.
To synchronize only individual components or directories, proceed as follows:
-
Click on
 .
. -
The server archive will then open.
-
Select the component you want to synchronize.
-
The path of the selected component is displayed in the field.
To exclude individual components from synchronization again, select the component and delete it with the button ![]() .
.