Install and update agents
This topic describes how to install and update Upload and Compare agents.
Agents are installed through a separate setup process. Each Octoplant software package includes the agent setup file by default. You can find the AgentSetup.exe file in the server installation directory.
Requirements for installing and updating agents
- Make sure that the Upload and Compare agents application is licensed.
- Make the
AgentSetup.exesetup file available on the target computer. - Do not install agents on a computer running a Octoplant server.
- You can install agents on a PC running a Octoplant client, but this is not required.
-
Consider the supported operating systems in Clients/agents.
-
Agents cannot be installed on Windows XP.
-
Make sure that the user or account running the installation has administrative rights.
Info
If the user running the agent lacks sufficient permissions for the default program directory, you can install the agent in an alternative location. For example, instead of C:\Program Files\vdAgents, use a path such as D:\vdAgentArchive\vdAgents or D:\vdAgents.
Procedure for installing and updating agents
- Run the
AgentSetup.exefile as an administrator on the target computer. - In the installation wizard that opens, select a language. English and German are currently available.
- On the welcome page, select Next.
-
Specify the directories for the agent program files and the agent archive.
You can enter the paths manually or select the ... button to browse for and select a path.
We recommend using the default paths suggested by the installation wizard:C:\Program Files\vdAgentsD:\vdAgentArchive
-
Select Next.
-
Choose the user account that will run the Octoplant services.
You can select either Local system account or Username.
We recommend selecting Username and specifying an account with administrative rights on the client PC.Info
The installation must be performed using an account with administrative rights.
The local system account may not have the necessary permissions. -
Select Next.
- Review the summary and verify your entries. If everything is correct, select Next to begin the setup.
A confirmation message appears when the installation is complete. - Select Finish to close the wizard.
Successful installation will show both services VDog UploadAgent and VDog CompareAgent running under the Windows Task Services.
Update agents
Standard agent update
When a new Octoplant server version is installed, the agent is updated automatically, for example, during job execution, provided that:
- The agent service has read and write access to its installation directory.
- The agent is running on a supported operating system.
Agents on unsupported operating systems
Agents running on unsupported operating systems are not updated. They can still communicate with Octoplant, but they remain on their last supported version.
Legacy agent versions
Agents older than version 8.5.1 cannot communicate with the server. To restore connectivity, update these agents manually using the installation setup. For more information about legacy agent versions, contact Support at Support.
FAQ
How do I change the account for VDog CompareAgent and VDog UploadAgent?
Uploads for some devices (e.g., Atlas Copco tightening system controllers or SIEMENS TIA Portal) may fail if the VDog UploadAgent and VDog CompareAgent services are running under the Local System account.
To change the user account for a service:
- Open the Run dialog by pressing Windows key + R, then enter
services.msc. -
In the Services window, locate VDog UploadAgent and VDog CompareAgent to check which account they use. If either is running under Local System, uploads will not work.
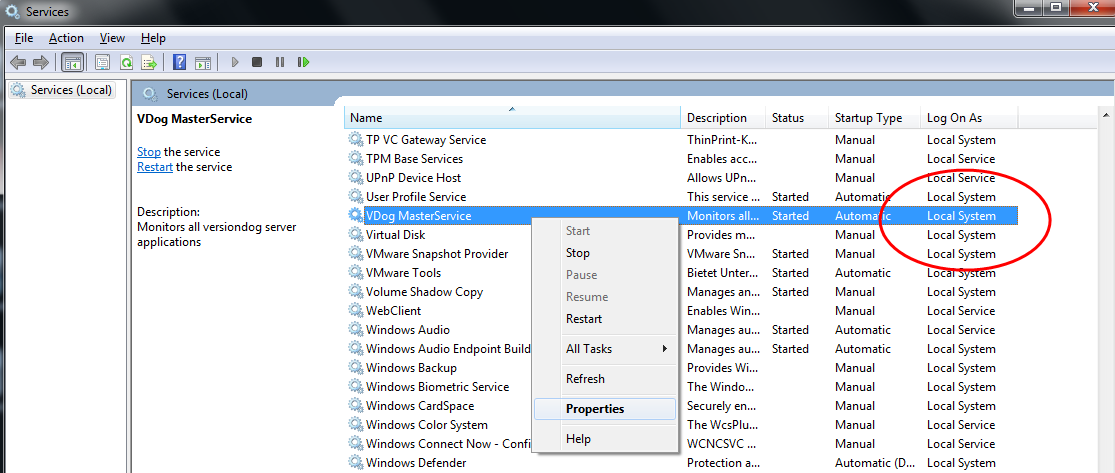
-
Right-click VDog UploadAgent or VDog CompareAgent, and select Properties.
-
Go to the Log On tab and choose This account.
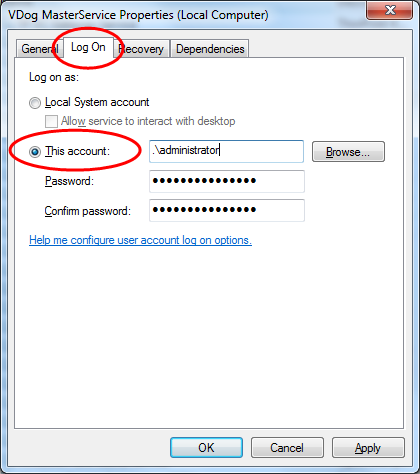
-
Enter the account name and password, then confirm the password.
- Select OK.
- In the Services window, select VDog UploadAgent or VDog CompareAgent.
- Select Restart to apply the new settings.